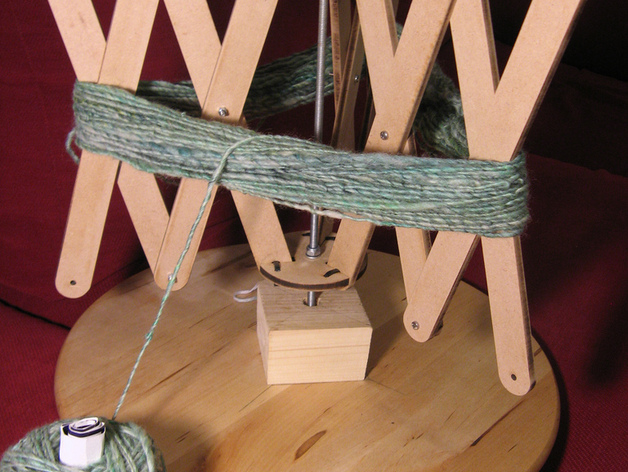
A swift holds a skein of yarn while it is being wound into a ball, so you don't have to fight it all the way. If you're a hardcore knitter, you buy your yarn from hippy communes in faraway places, or you spin it yourself[1]. This gives you yarn in skeins - long loops that are good for dyeing, but non-trivial to knit with. To get it into a ball, you need someone or something to hold it and prevent tangles, while you do the winding by hand or with a ball winder. That's where the swift comes in: it holds a skein of yarn, and rotates gently on demand, allowing to you to unwind/rewind yarn as needed without requiring a large family to assist you. The canonical example of a swift is the umbrella swift. Wikipedia has a picture: https://en.wikipedia.org/wiki/Swift_%28textiles%29 . We[2] wanted something similarly light, yet sturdy enough for the wildest of knitting parties. The arms of the swift expand to the diameter required for the skein when you press the top disk downwards, at least 1.8m for the parts given here. It is mounted on a rod around which it can rotate freely, but with enough dampening to not over-wind. It just feeds you yarn on demand. A video of the assembled swift: http://youtu.be/Rj0PEjT_9D4 [1] Disclaimer: we are not knitters, this is merely an observation. [2] I'm not the only one, rspanton was also involved in this project http://www.thingiverse.com/user:902 Mise en place 6mm MDF/ply/acrylic 400mm M6 threaded rod 3 x M6 lock nuts 1 x M6 penny washer 1 x M6 washer 12 x M3 20mm machine bolt 12 x M3 washer 12 x M3 locknut 6 x cable ties, 3 to 4 mm wide. A base (see below) Cutting For a swift that can handle up to 1.8m diameter skeins, or more at a stretch, cut the following: 1 x top.dxf 1 x bottom.dxf 6 x hinge_arm.dxf 6 x arm.dxf Sand and clean the parts - our MDF left a sticky residue which would have corrupted any virgin wool. Note that top.dxf and bottom.dxf are mirror images of each other. They are meant to be that way. Assembly The positions of the parts are shown in assembly.svg. We start by putting a lock nut on the M6 rod (1), about 20 mm above where you want your base to stop. The penny washer goes on top, followed by the bottom disk (bottom.dxf) with the cutting side up. The other M6 washer and another nut (2) follows. The lower nut serves as a pivot for the whole structure, the top one is there to prevent the base from wobbling too much. It should therefore not be tight, but just snug enough to keep the disk in place. Another nut(3) is installed about 80mm about above the bottom disk to serve as a stopper. Without it, it's easy to flatten the arms too far, and getting them back to a usable position can become annoying after the fourth time. Add the top disk (top.dxf), and check that the slots for the two disks are slightly offset. If not, flip the top disk over - the cutting side should be up. Now would be a good time to connect the rod to the base, but I'll first tell you about the arms. Connect two hinge arms (hinge_arm.dxf) at their centres (5) using an M3 bolt and nut, with a washer between the layers of MDF. This will be a pivot in the arm, so the struts should be able to move freely, but without flailing around. Align the struts with the slots in the top and bottom disks: the struts should be perfectly aligned with the threaded rod. If not, check that disks are the right way round. Both disks should have their cutting sides up (yes, this matters). Extend the arm with more struts at (6), then connect them at (7) as before. Repeat until you have 3 arms. Now take a minute to play with the arms. Awesome, right? The arms connect to the disks at (4), shown in more detail in hinges.svg. Thread the tip of the cable tie through the large hole in the arm, then through the small hole in the disk. The tip continues back through the same hole in the arm, then down through the opposite mounting hole, an through the head of the cable tie. Tighten and trim, then repeat for the other hinges. Putting the head under the disk look neat, and prevents wool from snagging on the stub. The base We mounted the threaded rod in a block of wood, fixed to a plank. Drill a straight hole through the wood, countersink it, then screw it down from both ends with two more nuts. We are also investigating adapting a clamp from a desk lamp to allow us to screw the swift to any flat surface - it will make the swift much easier to store. Modifications To accommodate different sheet thicknesses, the slots in the disks will need to be changed. Remember to keep the relative slot offsets, as the upper and lower struts in the arm rotate on top of each other. For small diameter skeins, you might want to make the arms shorter. If you want to be able to handle very large diameters, you could also add another set of struts. More arms can of course also be added, which should make the swift even more amazing. Finally Check all nuts - everything should be able to move freely. If you want the arms to expand a bit further, lower the stopping nut on the threaded rod. And that's it. Happy swifting!

