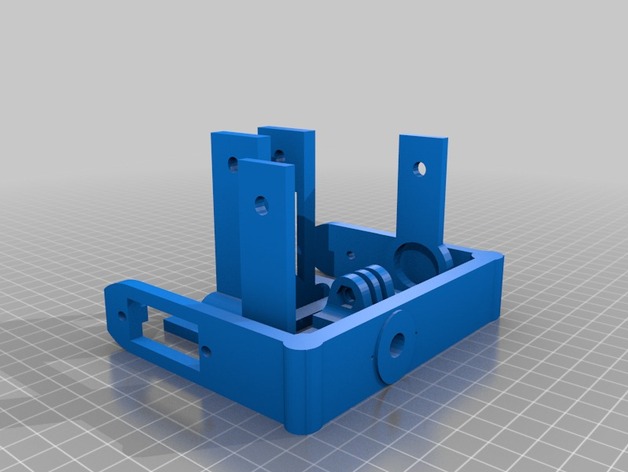
Version 2.0 of my 2 axis gimbal. After several flights with my original design i wanted to make my gimbal more sturdy. It is now set up to have the horizontal axis pivot on a shaft rather than on the servo horn itself. I needed to use prop savers to fill in the gaps to hold it ridged but all in all its much better than before. I also reduced the weight by thinning out the gopro mount and making it attach directly to the gimbal rather than relying upon the gopro mounting plate.Printed at .3mm on a solidoodle 2 Material ABS Extruder temperature 210 Degrees C Bed temperature (in theory) 110 degrees C Lay the objects on tray so that they print with the layers going across the axis of applied forces when in use. Assembly of the upper assembly requires a 4mm diameter shaft at 43mm length, 2 7mm bearings, and 2 shaft locks (don't know the actual term these are left over helicopter parts). One servo preferably metal gear, I used hitec HS225-mg servos Place the bearings in the 2 holes of what will be the bottom of this piece. This will be a friction fit I have found it to be sufficient and that way if I crash is easier to disassemble and trade parts. Now place a control arm on the top of the servo so the it is 90 degrees to the side of the body of the servo. Be sure to center the servo prior to this step. Here is the slightly tricky part, remove the 4 screws from the bottom of the servo and take the top of the servo off. Now slide the top of the servo into place in the centre of the mount so that the control horn is to the bottom. Re-attach the bottom of the servo making sure all bits are in the correct spot I secured it in place with a glue gun ( I reccomend a 60watt unit.) Now on to the C shaped piece with the servo hole in it. Mount the servo so the control spur is facing forward. Next place a bearing in the large hole at the back of the frame I used 2 on inside the other to cover the distance a quick edit of the STL. will fix it so that you can use a 4mm diameter bearing. Finally place a bearing into the remaining hole. Drill a small diameter (1mm) hole next to the rear main axis this will be for your control arm. The final bit of preparation needs to be done on the go pro mount. ON the arm that mounts on the servo I placed a servo control horn mounted with screws and hot glue. Make sure to mind your centres otherwise the mount will be crooked. Place a bearing into the opposite side in the hole. Assembly is fairly easy, take the 4mm shaft and advance it past the first bearing on the rear of the upper assembly. Now place 2 prop savers on the inside and slide the C mount in advancing the shaft as you go, you may need to put an extra prop saver in the space for the shaft in the C mount to reduce any play. Put 2 more prop savers in line and advance the shaft so it is all the way through. Place the shaft locks on either end and secure the grubs making sure they are tightly in place. Next place the control horn from the gopro mount on the adjacent servo. now secure the other side using the same method as above minus the prop savers. The final piece to assemble is the control arm. Make sure it is a straight piece that will not bend under strain I used carbon fiber rod and some 90 degree bends from broken landing skids off an old fixed pitch heli. If you have any questions just leave me a message in the comments and I will get back to you as soon as possible.
- 0 inches x 0 inches x 0 inches
- this product is 3D printed
- 16 available colors
- material is a strong plastic
- free delivery by May 08
- 0 parts