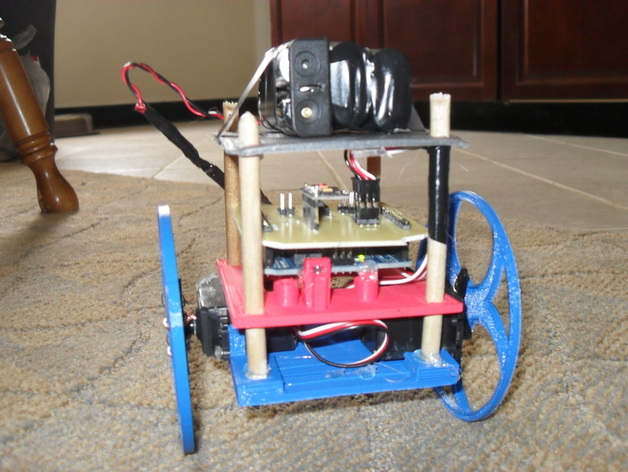
Balancing robot with printed wheels and structural parts. It uses a Arduino Uno, accelerometer/gyroscope, and a etched motor/servo PCB shield that I made. Here's a video of it in action http://www.youtube.com/watch?v=LAWjUlzAYf0&feature=plcpThe final robot is quite a bit different from the first prototype. You can see the progression of this project here: www.jddorweiler.appspot.com/electronics.html#robot I've wanted to make a balancing robot for a while but I was always turned away by the cost of all the parts. I tried to avoid using any expensive electronics or motors and instead tried to use common parts that other might have lying around. This is pretty much my first arduino/programming/PCB project so I'm sure there is room for others to improve it. Using servos was a cheap alternative to much more expensive geared motors but they're also a bit slow. This means that the robot can only recover from small pushes. The PCB was designed using Fritzing http://fritzing.org/ with help from http://www.fubarlabs.org and code is at http://github.com/jdorweiler/BalancingRobotThe board has the H-bridge, which can control two DC motors or one stepper motor, accelerometer/gyroscope, and two servo connections. The PCB isn't required but I did it for fun. The three iterations of the robot used a DC motor, stepper, and servo so I though it would be nice to make a board that can handle any of those. I got a lot of the code and good information was found from http://www.arduino.cc/cgi-bin/yabb2/YaBB.pl?num=1284738418/all and http://www.kerrywong.com/2012/03/08/a-self-balancing-robot-iIf your making the PCB and using a different accelerometer board, make sure to check the pins. They're probably not the same and the one I used. This would be easy to change in the Fritzing file though.Parts -Arduino Uno -4x 15 to 20mm M3 bolts and nuts or similar to attach the servos -2x continuous rotation servos http://www.adafruit.com/products/154 -Accelerometer/gyroscope board. Any will work. I used this one http://www.csgshop.com/product.php?id_product=64 -5/16 or 8mm round wooden rod (from any hardware store) -PCB etching supplies if you are etching your own board. Otherwise just use a bread board. Instructions Print 1x: -Servo mount -Arduino holder (I got this off thingiverse but can't find the page) -Battery mount (this is just the arduino holder, stop printing before the arduino mounts start printing).Print 2x: -Wheels (made from http://www.thingiverse.com/thing:21486 )Assembly is pretty easy. The wooden rods should be a tight fit through the square holes but if not a bit of hot glue helps keep them in place. Use some thin wire to attach the wheels to the servos. Download the code and PCB files https://github.com/jdorweiler/BalancingRobotGetting the robot to balance will still take a bit of work because of small differences in printed parts and servos. The main file in the Arduino sketch has a block of parameters to play with. These are the setpoint angle where the robot is balanced and the aggressive and conservative PID parameters. Its pretty much guess and check for those but I've left the ones that worked for me.
- 0 inches x 0 inches x 0 inches
- this product is 3D printed
- 16 available colors
- material is a strong plastic
- free delivery by Jul 23
- 0 parts