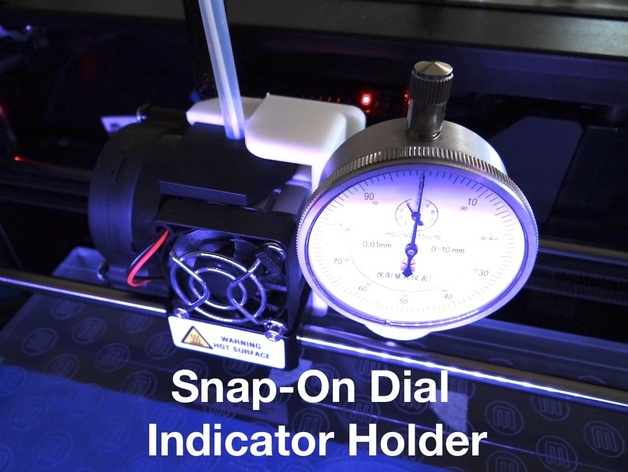
Yes this is another Dial Indicator Holder, but this one is different! I tried one of the others, and found the whole approach rather silly - why sit the indicator holder on the gantry rails when you can clip it onto the extruder and use the jog controls in ReplicatorG to position it? With this clip-on dial indicator holder you will get repeatable results, because you are relying on the extruder rail bushes to position the dial indicator over the levelling screws on the build plate.UPDATE (13 Feb 2013) There are two new STEP files which can be imported into other CAD programs. The first can be customised with your own hole size to suit different types of indicators. The other is a blank holder that can be used to design your own attachments.There is also a new script that automates the process so you don't even have to use ReplicatorG any more to control the process. The gcode has been exported as an x3g file - ready to download to your printer's SD card.Version 2 of my Clip-on Indicator Holder is compatible with my Replicator 2 Extruder Upgrade http://www.thingiverse.com/thing:42250This indicator holder was designed using an ACIS solid in Shark FX (sfx file included) so will behave well with Makerware, ReplicatorG and skeinforge.Because a few of you have asked - Paypal donations graciously accepted - whpthomas at yahoo dot comI purchased a cheap dial indicator from Hong Kong for $10 on eBay - which is plenty good enough for the tolerances we are dealing with.PRINTINGI used my 200 micron ReplicatorG profile http://www.thingiverse.com/thing:39050Infill 30% Layer Height 0.2mm Number of shells 2Once you have finished the print, push the dial indicator into the mounting hole. My indicator's mounting shaft pokes out about 2mm from the bottom.LEVELLING THE BUILD PLATFORMFirst time, run your usual bed levelling procedure. For best results, use a 0.1 mm feeler gauge, or the support card if that is all you have, then run my interactive build platform levelling aid http://www.thingiverse.com/thing:39430 to make sure the nozzle offset is just right. This procedure takes a bit of extra time and wastes some filament, but once you have the base layer printing evenly, you can use this nozzle offset to calibrate the dial indicator, so any time in future if you want to re-level your build platform all you need is your clip-on dial indicator to get the same result.AUTOMATIC LEVELLINGDownload the x3g automatic script file and install it on your printer's SD card. DO NOT clip on the holder onto extruder before running the script! Select Build From SD on the printer's menu and run the levelling script. The script will home, then centre and ask you to clip-on dial indicator holder. It will then position over each successive thumbscrew prompting you to make adjustments, and then over the centre. The dial indicator is positioned 0.2mm off the build surface to make sure it clears any residue left on the tip of the nozzle. Finally the script lowers the build plate and asks you to unclip the dial indicator holder - Make sure you do!I recommend you keep this script on an SD card with all your levelling and calibration objects.MANUAL LEVELLINGOpen ReplicatorG and select Machine->Control Panel from the menu, and set the Jog Mode to 20mm. Note: If at any time your Replicator 2 starts acting strange, like is has a mind of its own - like you try to drop the z axis and it just keeps going with other axes firing up - Don't Panic - hit the STOP button in the control panel. Exit the control panel, and click Reset, Disconnect and then Connect. This should clear out any gremlins. Not sure why it happens but it does every now and then.Then do the following:1) Home all axes (from the menu).2) Using the jog buttons in the control panel dialog, drop the Z axis and move the extruder along the x axis so its roughly in the middle.3) Clip on the dial indicator holder by aligning it on the bottom edge and pivoting the top over so the tab clips it into place (see photo). The edge of the tab should rub up against the filament feed tube.4) Now using the jog buttons in the control panel dialog, position extruder on the x and y axis so the dial indicator is above the rear levelling screw. Then move the Z axis back up until it hits the end stop switch.5) If this is your first time doing this, zero your indicator - or adjust how far into the holder the indicator is inserted so the zero position is where you want it. On my indicator, I wanted the zero to be at the top, so I adjusted the indicator by wiggling it back and forth while supporting the holder it with my other hand to adjust how far it was inserted. I did this until the needle lined up to the zero marker.Once you have already done this, you can ignore this step - but leave your indicator alone, so next time you want to level your build plate, your dial indicator holder will be ready to go. This works because this snap-on holder registers against the bottom of the extruder where it clips on, enabling repeatable results. If you need your indicator for other projects, maybe its time to spring for a cheap second one on ebay. I like the mechanical ones better because they provide repeatability, responsive feedback, and the batteries never run out.6) Use the jog buttons to move the extruder and position the dial indicator over each of the remaining level screws and adjust them to move the build plate up or down until the indicator needle is on zero.7) Move the nozzle back to the centre and double check the nozzle distance with your feeler gauge.8) Drop the z axis and unclip the dial indicator holder at the top by lifting the tab and pivoting away to remove.All up, this procedure takes just a few minutes to level the Replicator 2 build platform, and the results appear to be accurate and repeatable.WARNINGDon't run the levelling procedure or home the extruder with the indicator attached, or you will crash your indicator into the side of the gantry. So make sure you remember to unclip and remove it when you are done ;)
- 0 inches x 0 inches x 0 inches
- this product is 3D printed
- 16 available colors
- material is a strong plastic
- free delivery by Jul 04
- 0 parts