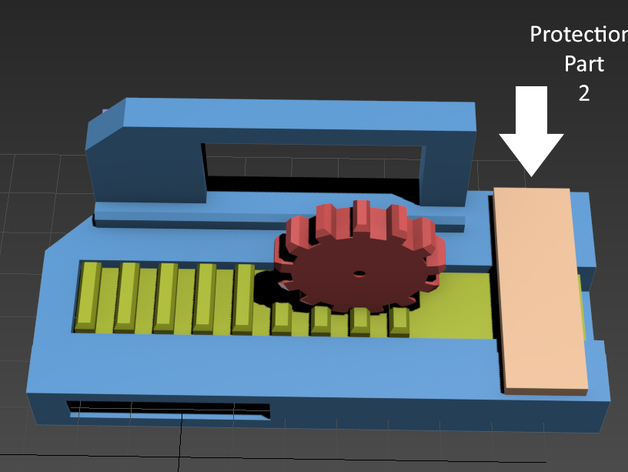
This is a motorized door lock inspired by The Amazing Spider Man. It makes use of a rack and pinion which converts the rotary movement of a servo motor to linear movement. Once the rack is extended, it fits into the "rack holder" which is screwed into your door frame. This model requires the use of a standard sized 180 degree servo motor. Some coverage by Makerbot themselves: http://stories.makerbot.com/post/95939577127/locking-a-door-like-spider-manFirstly print out all parts: The "Gear" can be at a low infill (~20-30%). The "Motor_Holder" needs to be printed at a high resolution and high infill (~70-100%). The "Rack" should be printed at about 50% infill and lastly, The "Rack_Holder" should be printed at 100% Once parts have been printed, press the rack into the holder. You will need to push it in at a slight angle to accommodate the edge sticking out. That edge is used to actuate a switch which can be glued in place. There is also another switch on the back. You can connect this to a MC unit to tell you what position the rack is at. It is not needed, you can hardcode servo positions and i willl work fine. The next step is to thread the 3 wires of your motor through the large gap and press the motor into its holder. You will need to drill your own holes. A good size is a 4mm hole but your servo mounts may be different. The final step is to set your servo at 90 degrees and mount the gear using a single screw. The screws come with the extra parts when you buy a servo so make sure you don't lose them. Lastly you will need to mount the "Rack_Holder" onto your door frame. Simply drill 2 holes and screw it into your door frame. Make sure to drill pilot holes into the wood first. And that's it. The next bit of information below, shows you how to prevent the mount breaking because of silly mistakes. The weakest point of this model is at the 90 degree angle where the motor mounts, so its best to screw a plate on the back of the motor mount to the base of where the rack fits in. This part is called "Protection_Part_1". Another tip is to use a low torque motor so it doesn't throw the rack into the back of the holder and that will break at the weak point. The easiest way to break the model is to close the door while the rack is extended. This will cause model to break at the mentioned weak point. The causes the motor to lift and that will detach the motor mount from the rack slider. Simply place a piece of plastic over the rack in front of the gear and bolt it to the holder. So if you close the door with the rack extended, the rack will simply lift up just a bit and collide with that plastic piece stopping any vertical movement to the motor. This part is called "Protection_Part_2". You can view the images in the gallery to help you gain a better understanding.
- 0 inches x 0 inches x 0 inches
- this product is 3D printed
- 16 available colors
- material is a strong plastic
- free delivery by Jul 20
- 0 parts