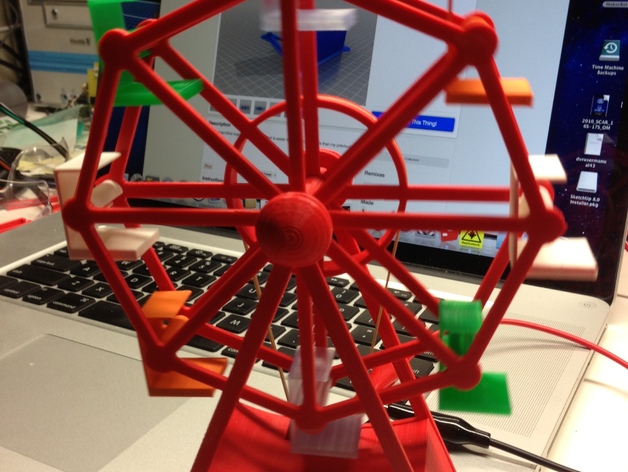
Mostly snap/slide together, this Ferris Wheel is easier to print and assemble while requiring fewer purchased parts than my first one.The download includes video of the Ferris Wheel in operation, albeit poor.1) Aside from "normal" 3d printing and electronic tools (soldering iron, solder, screw driver, modeling knife, 3D printer, ReplicatorG, PLA, 3VDC power supply, sand paper, etc.), you will need the following:a) 6VDC 45 RPM Pinky Finger Sized Gear Motor 1" Long x 15/32" x 3/8" from amazon.com b) wheel axel is a 1/4" aluminum rod, cut to 2" length, and polished (hardware store).c) 4, #4 by 3/8 sheet metal screws (hardware store).d) 22 gauge red stranded wire (6") (hardware store).e) 22 gauge black stranded wire (6") (hardware store).2) Level the build plate.3) Print Wheel Front, Wheel Back, and Pulley in whatever color(s) desired with the following ReplicatorG settings:4) Print Front, Back and 2 Hubs in whatever color(s) desired with the following ReplicatorG settings:Front and Back contain "skirting" to assist in avoiding warp during printing. After printing, carefully snap the skirting away from the parts and trim (with a modeling knife) and sand (with sandpaper) the edges.5) Snap Wheel Front and Wheel Back together. Start with one seat axel on Wheel Front, pinch the seat axel pin ends together with your fingers, and carefully insert the seat axel pin ends into the associated Wheel Back hole. Proceed around Wheel Front and Wheel Back until all seat axels are inserted into Wheel Back. If you break a seat axel, cyanoacrylate can be helpful, just make sure you allow adequate time for curing.6) Slide Pulley onto the gear motor shaft. If needed, slightly enlarge the pulley hole with a modeling knife. Do not force the pulley onto the gear motor shaft as the gear box is fragile.7) Solder 6" red wire onto the gear motor + terminal.8) Solder 6" black wire onto the gear motor - terminal.9) Slide the gear motor assembly (gear motor, red wire, black wire and pulley) into the rectangular motor holder in Front while allowing the red and black wires to slide through the slots in the motor holder. This should be a tight fit. I do not recommend sanding as if you do, the motor and wheel axels will not be parallel and thus the rubber band drive will slip off.10) Slide the wheel axel (1/4" by 2" polished aluminum rod) through Front, leaving 1/8" "proud". This should be a tight fit.11) Slide the Wheel assembly onto wheel axel. This should be a loose fit. If not, remove the Wheel assembly and sand and/or drill the inside diameter such that it spins freely on wheel axel.12) Place a rubber band on Pulley, and around the pulley on Wheel Back. Avoid twisting the rubber band.13) Place Back on the wheel axel, while feeding the motor wires out the wiring hole. Back on wheel axel should be a tight fit and leave 1/8" axel "proud".14) Secure Back to Front with 4 #4 by 3/8" sheet metal screws. At this point, Front, Wheel Front and Wheel Back, and Back, are assembled and wheel axel extends 1/8" "proud" of Front and 1/8" "proud" of Back.15) Print 8 Seats in whatever color(s) desired using the following ReplicatorG settings:16) Snap the seats on the seat axels.17) Print 2 Hubs in whatever color(s) desired.18) Press one hub over the front "1/8" proud wheel axel, the other over the rear "1/8" proud wheel axel.19) Adjust Front and Back, and Wheel Front and Wheel Back and Hub on wheel axel so that there is no contact between the wheel, Front and Back.20) Adjust Pulley on the motor shaft such that it is inline with the pulley on Wheel Back..21) Apply 3 volts DC to the red (+) and black (-) wires.Miscellaneous:1) Plastic on plastic generates more friction than I imagined, even at .1 layer printing. The seats now have a thicker "base" in order to overcome friction.2) In line with 1) above, the original wheel axel was plastic. However, with the downforce of the rubber band, the friction was such that the wheel would not rotate smoothly. There are two choices to avoid this friction; first is to use a polished aluminum wheel axel (which I chose), and second is to use a plastic wheel axel with bearings (which I'm working on). The bearing solution will be better, but will cost more.3) I polished wheel axel by placing it in an electric drill, then sanding it using 200, 400, and finally 600 grit sandpaper.
- 0 inches x 0 inches x 0 inches
- this product is 3D printed
- 16 available colors
- material is a strong plastic
- free delivery by May 02
- 0 parts