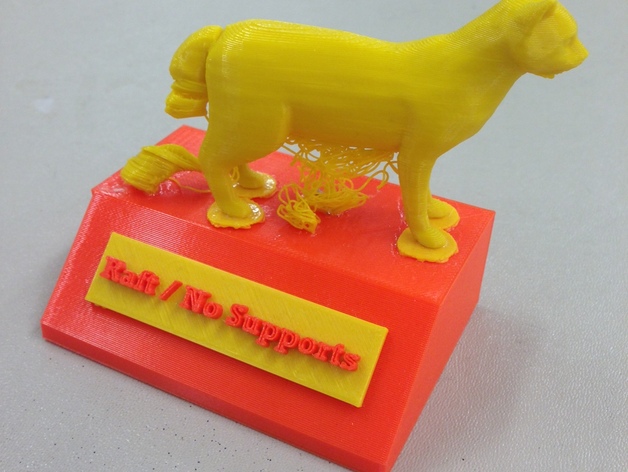
This is one of a series of educational displays I made for the Arcade Library in Sacramento to help teach people about 3D printing. It can be difficult to explain important 3D printing concepts like the need for supports, what a raft is, what shells are, infill percentage, and the effects of changing the resolution. Sometimes all you need is a visual aid to make things click. This display illustrates what happens when you print something without supports... what supports and a raft look like... and the final product after the raft and supports have been removed. See the instructions for details on how to make this display for your classroom, or anywhere else it will be useful. I've also included the SketchUp files if you would like to make changes. See the Infill Display I made here: http://www.thingiverse.com/thing:927750 And the Shell Display here: http://www.thingiverse.com/thing:927684 The cat model I used in this display was made by thingiverse user imaterialse: http://www.thingiverse.com/thing:1283The hardest part of printing these displays is printing the labels. You will need to pick two colors, one for the background of the label and one for the letters. Load the color you have chosen for the background of the label and start the print. I used the settings 0.3mm layer height, 2 shells, 5% infill for each of the labels. You will need to keep a close eye on your printer so you don't mess this up. Once your printer has completed printing the background of the label and has started the first layer of the letters, select change filament from the menu on your 3d printer. Proceed to unload the filament and load the second color you have selected for the lettering. Then continue the print. Repeat these steps for each of the three display labels. The rest is easy... Print "Raft and Support Display Stand.stl" in the color of your choosing three times. I used the settings: 2 shells, 10% infill and 0.3mm layer height. Then print "The Cat.stl" three times: -Once without any supports -Twice with supports and raft. Remove the raft and supports from one of the prints, and leave the other one alone. Finally glue the whole thing together. Use the pictures as reference. The glue I used is "Model & Hobby Cement" from the dollar store. It's strong but not so strong that you cannot get it apart if you make a mistake. Enjoy! Teach and spread the knowledge of 3D printing!
- 0 inches x 0 inches x 0 inches
- this product is 3D printed
- 16 available colors
- material is a strong plastic
- free delivery by May 07
- 0 parts