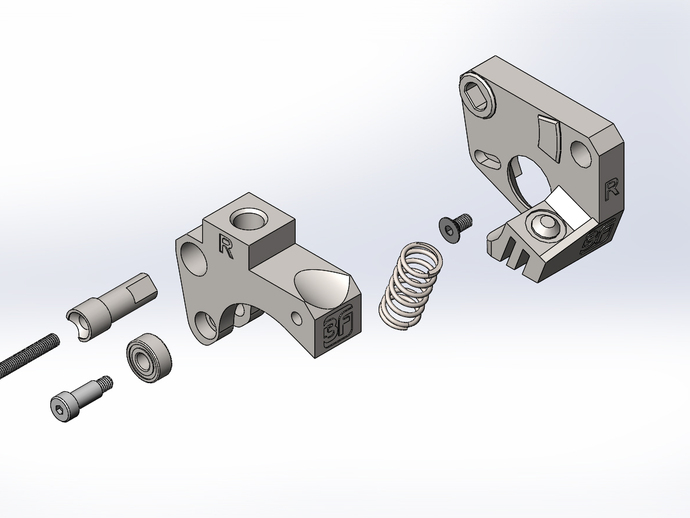
This is an extruder upgrade designed specifically for the Replicator 2X similar to whpthomas, and others, but with improvements. update Rev 3 http://www.thingiverse.com/thing:111711 -base is fully printable without supports -arm is printable with only external supports (bearing slot) -arm integrates feed tube mount as well -tension spring geometry improved -use 5/32" and 1/4" bits for tight clearance bearing/arm pivot holes -uses Makerbot hardware kit for Rep2 + 1 extruder screw ($8 ea from Makerbot.com) -can be pre-assembled for quick swap (under 2 minutes each) -L and R extruder parts included, and labelled (common pin) -Acquire the Rep2 extruder upgrade kit hardware only. ($8 ea shoudler bolt, small FH screw, bearing, spring) from Makerbot -I printed it at 0.27mm layer with no support on base, and external supports for the arm just because of the bearing channel. -you will need to chase the bore for the bearing shoulder bolt with a 5/32" drill bit just to make sure it is a tight fit. -you may need to chase the 1/4" pivot hole in the arm to make sure it is a tight fit as well. -you will need to lightly file the pin flats, and round edges to make it fit tight into the base key slot -the base key slot has a relief at the bottom to make sure the pin seats flush and square with no radius in the corners Pre-Assembly: -included parts are LH-Arm, LH-Base, RH-Arm, RH-Base, and a common pin (print 2 of them, and one each of the others) -put the small flathead screw into the deep corner countersunk hole in the base part. -put the pin into the arm part so it is flush on the outside face -put the bearing into the arm slot and secure with the shoulder bolt -shoulder bolt head should be flush to the outside face, and the threads should stick out the back -bearing should spin freely -put arm onto base rotating the pin so the shoulder bolt threaded end rests in the curved slot in the base face. -follow makerbot instructions on how to remove the existing extruder. -place the newly pre-assembled extruder upgrade onto the stepper. You may have to compress the arm slightly to move the bearing out of the way of the drive gear. -new extruder should seat flush to the stepper face. -use one of the long flathead screws from the removed Makerbot extruder through the corner pin to secure the new 2X extruder upgrade to the stepper. -tighten until snug, but arm moves freely with very slight resistance. -press the arm down until you can insert the hex-key though the arm hole to tighten the small flathead screw in the other corner. -repeat entire procedure for the extruder upgrade for the other side. Please let know if you have any suggestions on improvements.