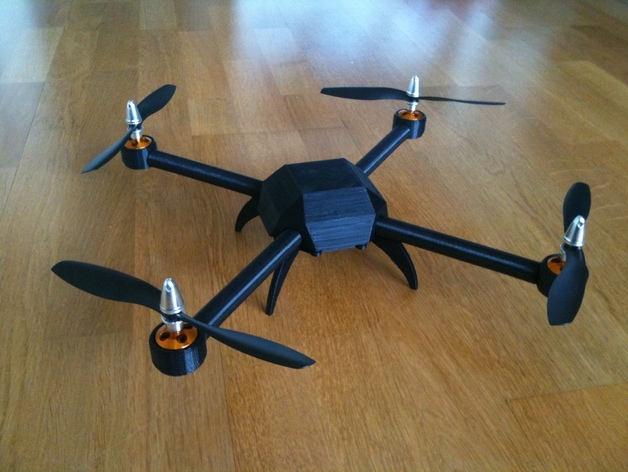
I have now uploaded a new version the PL2Q Hugin http://www.thingiverse.com/thing:19161Its a 3d printable quadcopter frame that i have designed, all parts is printable. See http://www.youtube.com/watch?v=DLrN-lrLtUsI have now uploaded a new version the PL2Q Hugin http://www.thingiverse.com/thing:19161Most parts should be backwards compatible with the PL1Q with some modifications.. if you already printed a PL1Q and want to use the stuff like the gopro camera mount etc..Download, Print, Build, Fly!But isn't a 3d printed arm to weak and will break in flight? Answer here: http://www.youtube.com/watch?v=RwZ5aTlU0iYnew flight video: http://www.youtube.com/watch?v=kSO47eAsI-E---new 2012-02-29-----pl1q_3cmtaller_canopy.stlI have added a optional 3cm taller canopy. Also tried reducing bridging by 50%..---new 2012-02-27-----pl1q_vampire_canopy2_makerbot.stlI have made a smaller canopy that should be printable on a makerbot, i also changed the top a bit so there is no huge bridging any more. Perhaps it is also printable upside down.. I also removed the screw holes i think it will stick if you just push it on. If not, glue on small velcro strip on each side inside and fasten to the battery holding velcro..---older new---- I have now sliced it up to be able to print on makerbot or other printers with smaller build area, i have not tried printing and assembling the parts, please leave a comment if you have.. It is the files that have makerbot in their name... Gluing would be required..and tape for the canopy..Presentation video: http://www.youtube.com/watch?v=DLrN-lrLtUsI printed mine on a Ultimaker with PLA using skeinforge35. I used 100% infill on the motormounts and the arms. I used 40% on the rest. Use 100% on the landing gears if you intend to do hard landings..Mine came out with the following weight:total 231.6gI used a couple of drops CA (glue) to fasten the motormounts to the arms.. (not between the arms and the body, the canopy locks them in place there)It might be a good idea to print it using a different color for the front arms etc, to be able to see the orientation of it when flying. I am going to fly mine mostly fpv..What i think is a good cheap setup for it: (i have not tested this setup myself, its just what i would have bought if i didn't have parts laying around)Motors: 4x A2208-17 1000KV http://www.goodluckbuy.com/a2208-17-1000kv-outrunner-brushless-motor-for-rc-helicopter-multicopter-4-pack.htmlEsc: 4x TURNIGY Plush 12amp (2A BEC) BESC http://www.hobbyking.com/hobbyking/store/__2161__TURNIGY_Plush_12amp_2A_BEC_BESC.htmlComputer: MWC MultiWii Lite Lightweight Version 4-axis Flight Control Board QUADX http://www.goodluckbuy.com/mwc-multiwii-lite-4-axis-x-mode-flight-control-board-quadx-w-ftdi-basic-breakout-.htmlPropellers: GAUI 330X 8" Props G-210801 http://www.gonitrohobbies.com/GAUI_330X_8_Props_G_210801_p/g-210801.htmProp adapter: 4x 3.175mm motor shaft 5mm prop hole http://www.valuehobby.com/3-175mm-collet-adapter-for-e300-e370-e400-e450-motors-5mm-prop-axle.htmlYou will also need silicone wire for the motors, battery plugg, a receiver,a radio, a 3s lipo battery around 2200mAh (and a charger for it)..I am working on fpv camera mounts for it, and gopro mount.. I post it when i am finished with them..I also have several ideas for future revisions of the quad so stay tuned, esc placement, weight reduction and so on.. :-)