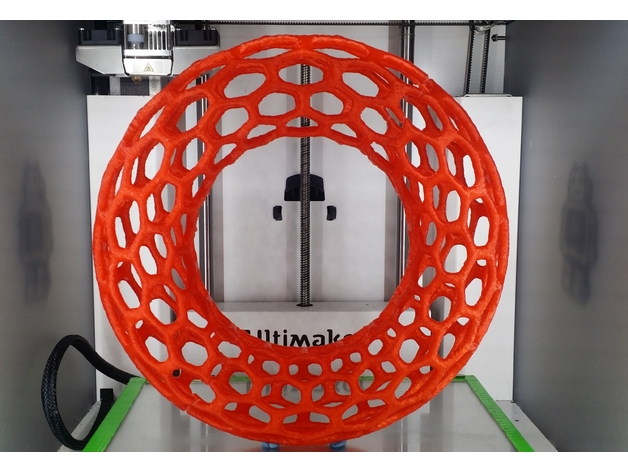
EDIT 1/10/2017: Finally got around to printing the model! Check the instructions below for slicer settings and tips. EDIT 8/17/2015: Added "HighRes ToT Arch (Repaired) STL" for easy printing!I created this model to test my printer's capacity to handle overhang as well as calibrate its retraction settings. I tried printing it several times before, but for some reason only just successfully printed it nearly two whole years after I uploaded it! Print and assembly instructions and slicer settings are listed below.I hope that you enjoy the model, and if you do print it, please upload pictures! :) Printer Brand: UltimakerUltimakerPrinter: Ultimaker 2Ultimaker 2Rafts: NoNoSupports: NoNoResolution: 0.15 mm0.15 mmInfill: 20%20%Notes: It is basically essential that you print the arch design (the file named HighRes_ToT_Arch_Repaired_STL.stl), then print another and glue them to form the completed shape...alternatively just keep the arch by itself.The make shown was printed on my Ultimaker 2 using PLA. I sliced the model in Cura (I had to scale the model down to 80%) with the following print settings:TIP: The very bottom of the model is quite small; it may be easier to print if you "sink" the model into the buildplate by translating the model in the negative Z axis (so that the model has a larger footprint. However, if you do so, the two halves will not fit together well.Temperature: 200 C Build Plate Temp: 65 C Infill: 20% Print Speed: 50 mm/s Travel Speed: 125 mm/s Layer Height: 0.15 mm Build Plate Adhesion: Brim with 10 mm width Wall Thickness: 1.05 mm (3 lines) ZHop when retracted is enabled NO SUPPORTS!Post ProcessingPrinting without supports leads to some severe drooping. I recommend going over the entire structure with a good craft knife and cutting it all off. Also, I realized that the two halves didn't quite sit flush, so I sanded the ends of each a bit until it fit a bit better. I held the bottom half of the arch in a clamp and dabbed some Gorilla Glue over all the edges, pushing the two halves together, then letting the glue dry. That's it!About the DesignThis particular fractal is a slight tweak from CmdrChaos's "Low Calorie Torus" (http://cmdrchaos.deviantart.com/art/Low-Calorie-Torus-344056205). My version simply tweaks some of the totoricalIFS values (specifically mulA1 and subA1). This model was created using Mandelbulb 3D, a free fractal rendering software.
- 0 inches x 0 inches x 0 inches
- this product is 3D printed
- 16 available colors
- material is a strong plastic
- free delivery by Sep 07
- 0 parts