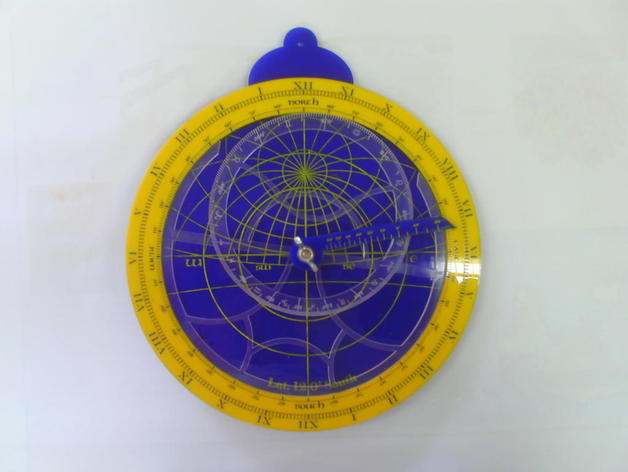
This was inspired by a TED video by Tom Wujec. See it here: http://www.ted.com/talks/lang/eng/tom_wujec_demos_the_13th_century_astrolabe.html I spent some time drawing this in Corel and used a variety of sources for copying the lines. The electric astrolabe from here; http://www.astrolabes.org/electric.htm was an excellent source and star fields can be printed for any location. Thanks to James Morrison for that. Another good source is from Daniel Rislove here: http://www.uwsp.edu/physastr/rislove/astrolabe/resource.htm You can print a paper version to test it. You can download a program for creating sundials and astrolabes ( they cost ) here: http://pagesperso-orange.fr/blateyron/sundials/shadowspro/ Since I currently live in Peru I was interested in creating an Astrolabe for Southern hemispheres, they work in reverse so I needed to create a different outer ring and rete. I have included parts for both hemispheres. The instrument is probably not very accurate as I used images as a starting point then drew over them using the line tool. It was easy to create the outer ring division in Corel accurately but the hemisphere lines in the centre were more difficult. If anyone knows a way of doing these mathematically for any longitude please let me know. Next step is to have a go at making this with a bronze plate using our Roland EGX 350. To create your Astrolabe you will need 3 mm acrylic of two contrasting colours and a clear piece for the rete. The rete could be printed directly onto a sheet of acetate if preferred together with a star field for your hemisphere. Raster the text and divisions first then cut out the edges. For assembly I used a bolt and wing nut through the centre the longer alidade goes to the back of the plates and the smaller rule to the front. The rete with the ecliptic fits inside the back plate and outer ring. make sure you use the correct ones for your location. To make one for your location you can create your own plates to fit inside the outer ring. Use one of the programs mentioned to create an image file and then draw over it in Corel. I used acrylic paint to fill in the lines with the opposite colour. Put a drop of paint onto the acrylic piece then scrape across it using a piece of flat acrylic. Make sure you raster deep enough for the paint to fill the lines. You can see the back of mine that the right hand side didn't take the paint well.
- 0 inches x 0 inches x 0 inches
- this product is 3D printed
- 16 available colors
- material is a strong plastic
- free delivery by May 10
- 0 parts