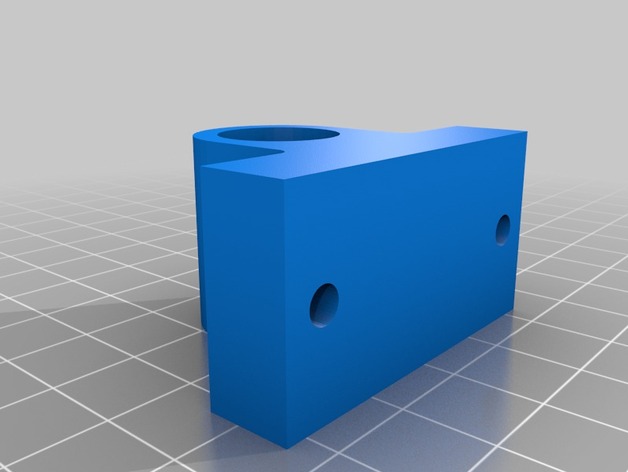
Ever since I received my Two-Up, and put it together, I had a few areas that I wanted to improve on. One area was the gantry setup. The second has to do with the bed travel and error. The bed in my case had some very noticeable error. If I were to face the printer and hold the left front corner of the bed and push it towards the back, and then back towards the front, I would see upwards of 2mm of play, even with the bearings glued down.. You would really see this play when the print is doing a thinner wall and is doing infill in that thin wall and is changing direction quickly. I was printing off a mold negative I was going to use for a silicon mold and the results were frustrating. The problem is that with that play and rapid change of direction, you would get odd effects on the far left side (closest to the origin, furthest from the belt) of the print. When I tried to do this mold negative, the results were bad enough to warrant a change. So, I had some smaller linear bearings sitting around (shorter) and decided to beef up the bearing support for the bed, especially after adding my heat bed and the weight associated with it. I designed and printed a bearing holder to mount on each rod just in front of each rod exit outside the frame. After putting these in place the bed is rock solid. It has absolutely no play. Here is a print of the same mold negative using the updated bearing set. You lose a little bit of the Y-axis travel, but with my heated bed, it almost lines up exactly with the bed anyways. Print off two of these bearing holders. I left the bearing holes tight on purpose because I used a drill to take more out a bit at a time and used a press/vise to press the bearings into the holders tight, and then simply screw them down to the platform that your printer sits on. The results have been fantastic. It definitely removed one area of error that was contributing a lot of noticeable misalignments. I have seen much better prints from this mod. One side effect of the rapid thinner wall printing and error was that there would be some "stringing" on the outer wall because the hot end would go too far outside of the perimeters. Here is a link to the linear bearings I purchased: http://www.amazon.com/gp/product/B008RIKN7W/ref=oh_details_o05_s00_i00?ie=UTF8&psc=1 The last two pictures show the mold print before the mod, and the print after the mode. Very worth while. Update 6/22: I have added a few tabs to a separate piece in case anyone wants to mount to the structure and not a table. Between the 4, 4mm holes try to get at least one on each side of the main bearing hole. So, get the bearing set first, then mount. I havent tried this design yet, but I would mount it with wood screws (unless you want or are able to disassemble the frame and drill out holes. I would drill a smaller pair of holes on each side, fill the edges of the wood holes with super glue and then screw the mounts in place.I printed this off with 40% infill and kept the bearing hole tight. You will likely need to file out the inside a little bit to be able to press the bearing in using a vise or press.
- 0 inches x 0 inches x 0 inches
- this product is 3D printed
- 16 available colors
- material is a strong plastic
- free delivery by May 02
- 0 parts