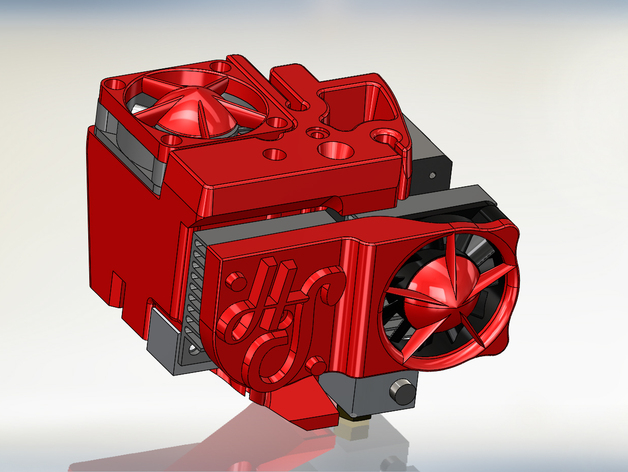
This mod eliminates the second extruder assembly on a FlashForge Creator-X. It re-uses the cooling fan from the missing extruder to blow air on the print nozzle via a duct from the top. The only new hardware you will need is screws to hold the fan down in it's new location, and two small nuts that should come in your spare parts bag to insert into the slots on each side of the main body. There are slots on each side of the main body to slide in a pair of nuts (should have come in your FF extras bag) to tighten it up against the aluminum mount rail. This uses the original stepper screws. The stepper on the right will need the screws shortened to 20mm, or to be replaced with 20mm screws. The mod attempts to: Lighten the moving assembly (minimize stress, vibration, wear) Eliminate failed prints caused by the second nozzle interference Improve print resolution and quality by maximizing solidification as PLA exits the nozzle Simplify extruder maintenance, and improve access during maintenance Provide better support for the filament guide tube May also work on corresponding Flashforge and MakerBot models, but no promises. More interesting info here: http://open3dp.me.washington.edu/2014/11/flashforge-creator-x-reducing-mass-improving-build-quality/The main body prints well upside-down. It needs support under the section where the top-mount fan goes. The nozzle I have seen printed a variety of ways, The best results usually being with the cylinder pointed straight up. Nozzle version 2 slides onto the existing post that the left heater block threads onto. This is an option in case you have a hard time removing your stainless tube, or just don't want to deal with finding o-rings to fit. I usually print with 3 shells, and 20 or 30% infill, but it's up to you on that stuff. You'll probably have to experiment. I have had a few people re-print this whole assembly after they install it, because their print quality goes up so much compared with the stock setup. To do the hardware install, you need to: Remove the top plate (2 screws) and snip the zip tie that holds the wires to the little spacer post. Unplug the stepper motors. Remove the 4 front screws holding in the stepper motors and fans on both sides (don't lose those spacers!). Remove the two screws that hold the aluminum bar on to the X-Axis carriage (underneath the carriage). Remove the bar from it's saddle, and turn it around. The set screws that hold the stainless hot ends are accessible from the back of the bar (don't remove the right side yet). Loosen the set screw holding what is when viewed from the front, the left extruder. The parts and wires can now be completely removed, and the parts saved as spares for the right side. If you don't want to remove them completely, I HIGHLY RECOMMEND AT LEAST UNPLUGGING THE UN-USED HEATER FROM THE CIRCUIT BOARD TO PREVENT FIRE HAZARDS/DAMAGE FROM ACCIDENTALLY CHOOSING THAT SIDE ON YOUR CONTROLLER! Now for the right side, take note (or a picture) of the amount of hot end that protrudes from the top of the aluminum block. This is usually about where the chamfer ends. Then loosen the set screw for the right hot end, and turn the assembly around 180 degrees. Re-tighten the set screw making sure that the protrusion of the tube from the top of the aluminum block is the same as before, and that it sits as square as possible to the block. If the two aren't square to each other, the assembly won't go back in properly. It is time to remove the heater and sensor from the block, and re-install them facing the other direction. This way the wires will go out of the back of the assembly when the aluminum block is re-installed. First loosen the set screw holding in the heater, and pull the heater out. The set screw is hiding under the ceramic insulation and kapton tape around the heater block. DO NOT REMOVE THE TAPE. Poke a hole through the tape with a pick or the tip of a hobby knife so you can inert a hex wrench without disturbing the rest of the insulation. The screw is located on the bottom of the block centered under the heater. Do not re-install it yet. Now remove the sensor and re-install it on the other side of the block. DO NOT TWIST THE SENSOR WIRE. Instead, hold the sensor in place with a small wrench, and turn the block assembly to unscrew it. Then repeat this process in reverse when re-installing on the other side. Re-install the heater in it's new orientation, centered in the block, and tighten the set screw. With everything upside-down, install the main body of the half stepper in it's new home.This is easier upside down so the semi-captured nuts don't fall from their new home. Now you can re-install the aluminum block on the X-axis carriage. This can be a little challenging because the heater block will butt right up against the inside of the carriage (this is why it needs to be squared up). The best thing to do is get the screw on the right started into the bottom of the block (be careful not to cross thread it) and once it is a few threads in, go to the other side and get that one started. Once they are both started, you can tighten up the whole assembly. From here, it's just a straightforward re-assembly job, assembling the new pieces as you go along. If you have issues getting the vent duct to slide through the center slot, it is probably snagging on the belt clamp. These are not manufactured with a high tolerance, so you may just need to file the clamp a bit for clearance until the duct passes through unencumbered. The nozzle can be held in with an o-ring slipped into one of the slots and held in with friction, or a screw with a washer inserted through the hole in the top of the aluminum block. The guide hole will have to be drilled to capture whatever size screw you use. DON'T FORGET TO RE-LEVEL THE BED BEFORE PRINTING! Your nozzle will be at a different height from all this fiddling. Note: I have been running my cooling fan by moving the wire leads to, and sharing the port that runs the cooling fan for the stepper drivers. It's not the most elegant solution, which would be to use one of the other unused ports (like your EXTRA port), and change your start and end G-Code to control the fan through that port. I have been running my accessory fans this way for a few months with no ill effects. If you were worried about overloading that circuit, you can also go straight to the power supply, but I wouldn't do this without fusing it properly.. These two options will result in the fan running as long as the bot is on. ########From the comments section######## ryancarag - in reply to jmsjgill "There's a port labelled EXTRA on the FFCP and Microcenter PowerSpec 3D Pros that is recognized as a filament fan. It responds to whatever you put in the slicer for the layer by layer fan speed and any bridging overrides. I've been running a filament fan for awhile with the dual extruder duct, and it works great."
- 0 inches x 0 inches x 0 inches
- this product is 3D printed
- 16 available colors
- material is a strong plastic
- free delivery by Jul 09
- 0 parts