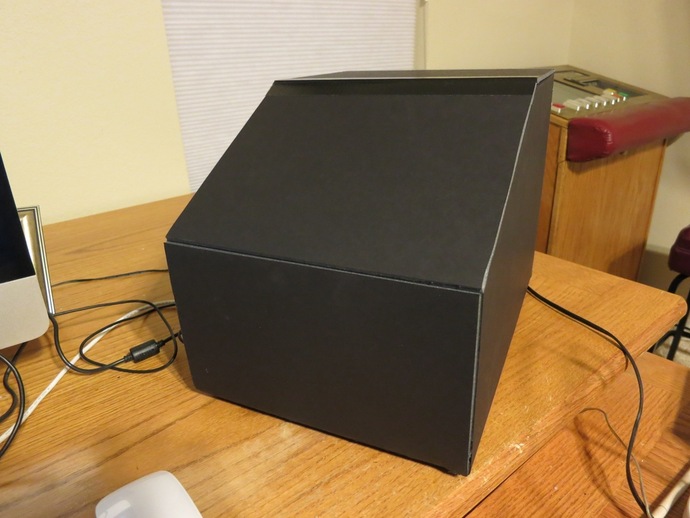
Fabscan is an affordable laser scanner for Mac OSX and Linux Ubuntu designed by Francis Engelmann. Fabscan Lite is a derivative that uses printed parts and wood dowel rather than laser cut panels for its construction. The geometry can be adjusted by trimming the dowel pieces and an enclosure is optional (but desirable) because I've incorporated a laser target in this design. The enclosure is made out of a single sheet of foam board which is scored with a hobby knife, folded and simply hot glued together. The assembly is hot glued in place. Complete details for the original Fabscan can be found at http://hci.rwth-aachen.de/fabscan I've got about $120 usd in this project not including the printed parts. I've put a video together demonstrating the alignment, scanning and post processing. I'm not an expert at any of this, so please be kind. Note, skip to 3:30 in this video to only view the usage and not the setup of Fabscan Lite http://www.youtube.com/watch?v=Jg9gbO4OBYQ Update Francis has been working hard on Fabscan and has uploaded a new version 100.8 which has fixed a lot of bugs (not all) and has the Powercrust function built in. I'm now getting nice scans and finished STLs. Disclaimer: There's some adjustments along the way and you can't expect it to work as soon as you put the last bit of glue down in the box. When it's all completed you align the laser and the camera and scan. The software is buggy but gets the job done. I'm using an iMac with OSX 10.8.3 and Fabscan 100.4, then an earlier version of Fabscan to use the "Powercrust" function which converts the point cloud into a useable STL. I'm hoping for a finished version of Fabscan 100 that includes the Powercrust function. I've put a video together demonstrating the alignment, scanning and post processing. I'm not an expert at any of this, so please be kind. http://www.youtube.com/watch?v=Jg9gbO4OBYQ The best approach to build the project: Break down the project into parts. I built the electronics first, installed the software and made sure it all worked. Next I printed the plastic parts. Then I cut the lengths of wood dowel and fit all the pieces on my desk together measuring to get the dimensions right. Mounted the camera, Led light and laser. I did a quick alignment and then did my first scan in a darkened room. I built the box and glued the properly dimensioned assembly in the box last. Overview: Build the motor shield for the Arduino UNO Install the Fabscan software and flash the Arduino UNO firmware Print the seven parts and four optional feet Cut six pieces of 3/8" wood dowel to length Assemble the pieces Build the enclosure from black foam board Parts list: 1 length of 3/8" wood dowel - hardware store 1 Logitech C270 webcam - Amazon 1 5mw focusable red line laser - Aixiz Ebay 1 NEMA 17 stepper motor - max body length 36mm - eBay* Build the Arduino motor shield: Looking at the photos you could copy how I wired this up. I used single stranded hookup wire to make the connections. Try to be neat and make sharp clear paths. There's really not much to this circuit, take it one connection at a time and verify each connection. The blank shield comes with a terminal block to wire the motor. I've included the schematic, note that only one stepper motor driver is used. I used a 3.2 volt laser so I used a buffer circuit like what is show for driving an LED except a 1K ohm resistor on the base and I used two 1n4001 diodes in series to drop the voltage. I used a 2n2222 for the switching transistor, there's only 20ma to handle. I wanted the scans to be consistant so I added an LED to illuminate the interior so I can close the box during scans. I used an LED from a light strip I had lying around in series with a 150 ohm resistor wired directly to the Arduino shield so that it's always on. I glued the LED to the top of the camera mount. Use only one LED, more that this will wash out the laser. There's a small potentiometer on the stepper driver board that controls the current to the motor, set too high and the motor runs hot, set that as LOW as possible to avoid softening the plastic of the turntable mounting hole. Printing the parts: I printed this thing in PLA using .25mm layers at 20% infill. I ran the STLs through Netfab so they are clean and ready to slice. Printed parts may need to be trimmed, holes may need to be cleaned up with a hand held drill bit. Cut the 3/8" wood dowels: Be as accurate as possible, the errors will add up! That said, you can adjust the length later if you mess up and a new piece of dowel is cheap! There are six pieces to cut, one has a 50 degree angle on one end, this angle is not critical. Refer to the photo, cut one each 361mm, 240mm, 160mm, 116mm, 88mm straight pieces. Cut a ~50 degree angle and then measure and cut to a total length of 220mm. Assembly: First a note about fit, your plastic pieces could be tight or loose, adjust by sanding the dowel ends or add a layer or more of plastic tape. Install the motor in the turntable motor part. I had to clean out the dowel hole with a drill bit in hand, it doesn't have to be pretty to work. Refer to this link to prepare the Logitech C270 camera: http://hci.rwth-aachen.de/fabscancamera Use the screws that came from the camera assembly to mount the camera to the camera piece. Push the 12mm laser into the laser mount, use a piece of tape for fit. Slide the Arduino tray on the 220mm dowel closer to the flat end. Slide the Arduino UNO and secure it using a drop of hot glue on an outer corner. Refer to the photo and layout drawing and push the assembly together. When you've got it all in place measure and make adjustments to the structure, try to get it within a mm, the dimensions are on the layout drawing. Square up the assemble on a flat surface, you may have to twist the parts one way or another. Measure from the center of the motor shaft to the closest point on the laser target dowel, is it 90.1mm? If not adjust it. Again measure between the center of the motor shaft and the face of the upper camera mount, is it 237mm? There should be about 125mm of dowel showing between the base camera mount and the laser corner. Slide, trim and adjust to get these dimensions as close as possible. Use sand paper to rough up the surface of the turntable to remove any reflections. Reflections from the laser will create artifacts in your scans. Insert a 3mm nut into the slot and a 15mm screw through the hole. File a slot on the side of the stepper shaft about 5mm before the end. Push the turntable on the shaft and secure it with the screw. Don't tighten too much because you will distort the turntable. Check the tightness of this screw with the turntable enable in the software. Build the foam board enclosure: Refer to the drawing and score only part way through the foam board. I wrapped electrical tape on my hobby knife to set the depth. Then you simply fold the pieces into the box shape and tape the corners. I folded toward the scored lines leaving then used hot glue to tack them in place, then I laid a bead to seal the walls.
- 0 inches x 0 inches x 0 inches
- this product is 3D printed
- 16 available colors
- material is a strong plastic
- free delivery by May 01
- 0 parts