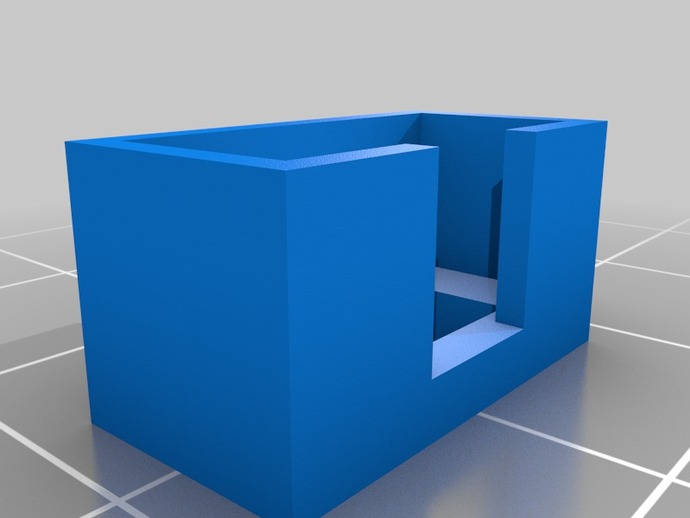
This is a 6-Pin Shrouded Male Connector which accepts an IDC Connector. I bought some Polulu Carrier kits and only a 10-Pin Connector was included. Unfortunately, I don't have any electronics suppliers in my town and I didn't want to wait for a delivery, so I built my own. Update: Openscad Parametric Version coming soon. I keep meaning to learn some OpenScad so I can easily make these types of things parametric, but every time I start, I end up thinking, "Man I could get this done in like 20 seconds in Sketchup".Pictures on the left kind of show you what to glue where. It is pretty obvious but I posted them just in case. Noticed that some people are printing these and end up with walls that don't get filled. This is an issue with the 'extra shells' options in Skeinforge. For some reason skeinforge has trouble with small or thin objects when you have extra shells turned on. To fix this issue, set the three 'extra shells' options to 0 in the 'fill' plugin. This 'bug?!' may be fixed soon, I don't know, but it is confirmed to exist all the way up to the current version SF40 I believe.Print the part. Get an IDC connector and stick 3 x 2 male header pins in it (picture 1). I used one with a broken clip for testing purposes just in case I was sloppy with the glue. Surround the walls of the opening in the bottom of the printed connector shroud with some ABS cement (Picture 2)(I use Plastruct Plastic Weld, which you can get in just about any hobby shop). Stick your IDC connector with the male header pins into the hole. Wait for the ABS Cement to set. I also put glue across the bottom of the assembled shroud, to get better adhesion (picture 3). Remove the IDC connector once you are sure the cement has set. And you should now have an Assembled 6 Pin Shrouded Male Connector for your Electronics Projects!
- 0 inches x 0 inches x 0 inches
- this product is 3D printed
- 16 available colors
- material is a strong plastic
- free delivery by May 09
- 0 parts