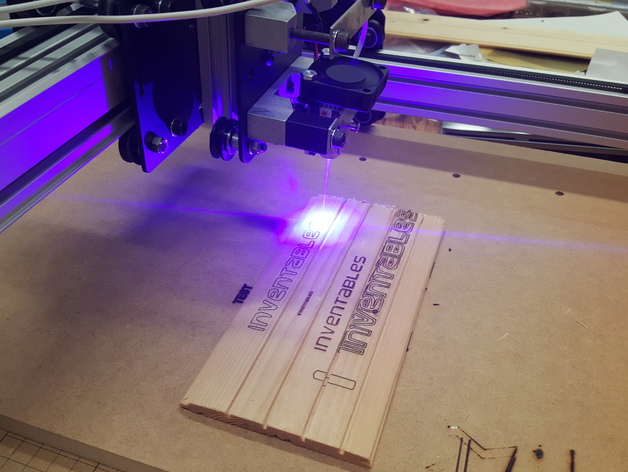
The ShapeOko project is one of the fastest growing open source do it yourself CNC machines ever. It is made from the popular makerslide and standard Arduino electronics. So, if you are one of the thousands who own a ShapeOko and are having fun making stuff but want more, this is your answer! Let’s put a laser on it and do some engraving and cutting! Check out more instructions on our website here: http://jtechphotonics.com/?page_id=1100 Some videos of it cutting and engraving: https://www.youtube.com/watch?v=WJjHBUXykJs https://www.youtube.com/watch?v=isdD1Ww4_g8 The 2.8W laser kit is here: http://jtechphotonics.com/?product=new-2-8w-laser-and-2-5amp-safety-compliant-driver-kit-with-us-style-power-adapterElectronics – Connecting the Kit The standard ShapeOkO2 electronics are the Arduino Uno and the GShield. If you bought from the Inventables and got the entire kit, you got an original Arduino Uno. If you bought the electronics from Synthetos then you will have a different Arduino board. No matter, the connection is the same either way! The connection is pretty easy. You can either connect to the GShield on the top or to the bottom with the Arduino. Soldering a wire into one of the holes is the easiest way to get going. Or you can solder a piece of a standard break away header and use a jumper wire cable. Either way you are going to need to connect the following: Pin 12 Labeled “12” on either Arduino or GShield to Laser Driver Input “+” Pin 14 Labeled “GND” on either Arduino or GShield to Laser Driver Input “-“ Software – Controlling the Laser Now that you got everything ready with the wiring, now it is time to turn on the laser with GCode! The GRBL firmware supports a feature to turn on a spindle and turn it off. Typically, most of the spindles are Dremel type ones with no external trigger and require a manual turn on, so this pin probably is not used. Even if it is, there are numerous connection points so the two can share (but make sure to turn off the spindle power before you run!). So, what are the commands? The standard command to turn on the spindle is M3 and to turn it off is M5. So, to turn on and off the laser it is: M3 – Turn Laser On M5 – Turn Laser OFF Mechanical Mount Take off the spindle and replace with the 3D printed mount. Use the two screws to attach the laser to the mount and then to the spindle mount. Check out the pics and the pdf for details. Running Your ShapeOko 2 Laser Running your new laser upgraded system will be exactly like when you were running it with a spindle on it. Just make sure you have all of your safety gear in place, the laser focused, power set, and everything powered on and ready to go. Here is the link to running your machine on the ShapeOko website. Instead of using a spindle, just replace all of it with a laser. We set our focus for the laser at about 3? for the shapeoko. This will be about at the bottom of the Z travel using our mount. Set-up for Photo Engraving If you want to use your shapeoko to engrave photos, Andy Sandoval has made a version of the firmware to be able to switch from “laser mode” and “spindle mode” pretty easily. The idea is that the firmware will take the Z axis commands and turn it into a 0-255 signal for the PWM control on pin 11. You need to set your Z axis focus to the top of the work surface because the Z axis is stationary while picture engraving. The guys over at PicEngrave.com have been testing it out and it works great. You will need to have a sender program for your ShapeOko that can handle the large G Code files. It is sold by PicEngrave here. Hardware Setup: If you want to use the shapeoko for photo engraving you will need to change your laser output pin to pin 11 on the arduino board. This is the pin that had PWM. Software Setup: You will have to put a new version of the firmware on your Arduino board. DOWNLOAD IT BY CLICKING HERE. You can then load it on your UNO using your USB cable and a loading software. We like using X Loader, a simple loading program. You can find X Loader here. The PicSender Program now is configured so you do not need to switch between modes for spindle or engraving. You will use the output of PWM from the piclaser lite program to generate the G code needed to engrave.
- 0 inches x 0 inches x 0 inches
- this product is 3D printed
- 16 available colors
- material is a strong plastic
- free delivery by May 02
- 0 parts

