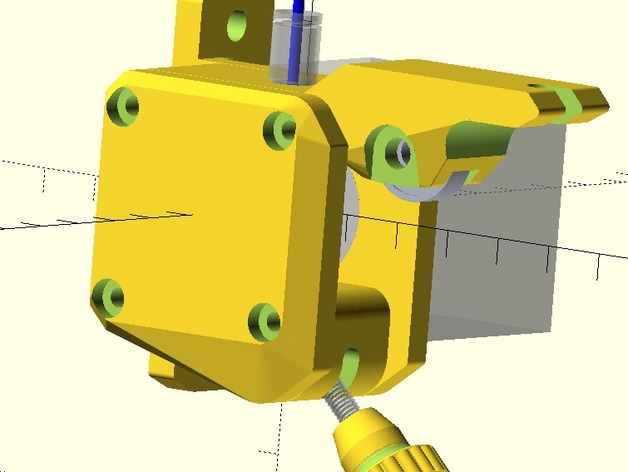
This is the bowden extruder I designed for my new CoreXZ printer (QuorXZ). I have included the necessary SCAD files if you want to modify it. It is designed to be mounted (without a spacer) to a Nema 17 motor through 6mm or 10mm MDF, or directly to a motor using one or both 5mm spacer(s) included. See instructions for necessary parts to build. 8-29-15: Added Thumb-screw tension adjuster. (Also modified the lever a bit to better fit the thumb-screw.) 9-1-15: Modified Thumb-screw adjuster. 9-3-15: Added tabbed spacer with M5 mounting holes. 9-15-15: Added printed barrel w/nut insert (untested). 9-16-15: Modified barrel w/nut insert. NOTE: As I modify this thing, I will REPLACE older files with the newer files. What is here is the latest iteration.Watch the extruder in action on my new printer (QuorXZ) in the video below.You will need several parts to complete this thing as designed. (1) SMC KQ2S04-M5A push-fit connector (Amazon) (1) MK8 hobbed gear - 9mm OD X 11mm (Ebay - Leap3D) (1) M5 X 15 low-profile screw (OpenBuilds) (2) 5mm X 10mm X 1mm precision shims (OpenBuilds) (1) 5mm tapered tee-nut (OpenBuilds) (1) 5mm X 16mm X 5mm ball bearing (OpenBuilds 625 2RS) (1) 5mm X 10mm X 4.2mm ball bearing (OpenBuilds Mini Ball Bearing) (1) 12mm X 8mm diam Barrel-nut with M4 threads (EBay - screwseller0178) (1) M4 X 30mm screw for clamp (1) M4 nut (if using printed barrel instead of metal barrel-nut) (1) M4 X 12mm (by 6mm OD) spring for clamp (ThingiBox.com) (4) M3 screws of appropriate length (40mm if mounting through 10mm MDF, 35mm if using 6mm MDF or one printed spacer directly to motor) NOTE: Substituting hardware will probably require modification of printed parts - spacing is compact and tolerances are fairly tight. I printed all parts with 30% infill. Cover may need to be printed with supports - others do not (YMMV). (Lever, cover, and tabbed spacer will need to be re-oriented. Thumb-screw adjuster should probably NOT be re-oriented.) The printed barrel is untested. I think it should be printed with 100% infill and sanded smooth. Use a 2mm or 5/64" drill bit to clean the filament path. I used a 10-24 self-tapping screw to start the threads for the M5 push-fit connector (I may redesign that hole to make it easier to tap with the connector itself). [Note: To properly render the cad objects, all .scad files must be in the same directory.]