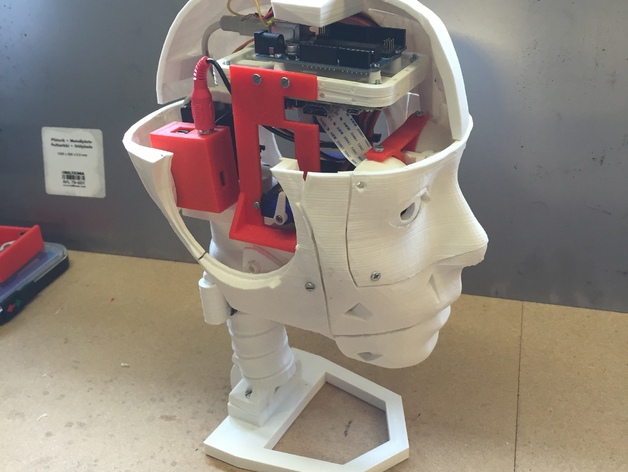
First of all I want to say thanks Gael Langevin who is the creator of the InMoov 3D-printed robot that I'm building. You can find the original design on his site http://www.inmoov.fr. This post is the second one in a series of changes that I have made to the head of the InMoov robot. The first post can be found here: http://www.thingiverse.com/thing:992918 The third post can be fond here: http://www.thingiverse.com/thing:1035688 This post shows the parts that are used to mount the raspberry PI 2, the Arduino Uno, the USB soundcard and the servos for the eyes. The holder for the Raspberry PI 2 is made from http://www.thingiverse.com/thing:754078 The holder for the Arduino UNO is a remix to make more room for the USB cable. The two holders are mounted back to back so that the Raspberry PI sits with the component side down and the Arduino with the component side up. The USB Sound card is monted on bracket on the opposite side from the HDMI port of the Raspberry, as can be seen on the pictures.If you want to use the parts from this post in the InMoov head, you first need to make the changes from my first post. Print the holder for the Raspberry PI from http://www.thingiverse.com/thing:754078 ( raspberrry_bPlus_2b.stl ) and the holder for the Ardino from here ( ArduinoUnoV2.stl). Mount them back to back with screws. Make sure that the USB ports of the Raspberry and the Arduino will point in the same direction, i.e towards the back of the head. Mount the Raspberry and the Arduino to the holder unit. Print two brackets ( CardHolderV1.stl ). They don't have any monting holes at the bottom, so you have to drill them. The big sqare hole in the brackets can be used to mount up to 4 servos on each side. For example if you want to do facial expressions. I mounted 3. One to tilt the eyes up and down. One for each eye to turn left / right. Print the USB Soundcard holder ( SoundCardHolderV1 ) if you plan to use a microphone. Mount the USB soundcard on the side of bracket as seen on the pictures. The brackets can now be mounted to the Raspberry / Arduino. Mount the cables that you will use and test where it will fit best in the head. Mark and drill holes in the brackets on the NeckRedesignV5 and screw it together with screws and nuts.Experiences using the PI in the InMoov headThe PI runs the MyRobotlab software and communicates with the Arduino. I have tested using the camera from MRL and have had mixed results. My first test were OK, 16 fps, but then reinstalled Jessie and have not been able to get the same results. I think the problem is that I'm using OpenJDK at this moment. I will install Oracle java instead. You can see my first tests here: http://myrobotlab.org/content/opencv-300-and-javacv11-built-and-worky-raspberry-2. Update: Installing Oracle JDK made a huge difference. Not only for the performance of OpenCV but for all processes in MRL.I also tested streaming from the PI camera to my PC. You can see the results here. http://myrobotlab.org/content/testing-streaming-rpi-camera-mplayer-my-pcI tested doing some image processing in python (i.e outside MRL, since MRL is using jython). I found some good documentation on picamera https://picamera.readthedocs.org/en/release-1.10/ and I also read Adrian Rosebrocks blog and have tested many of his examples. http://www.pyimagesearch.com/ I have tested several image processing algorithms, but I'm still learning. And I have to admit that a lot of time has been spent on installing and compiling different components and dependencies to be able to do image processing. Sound is a different chapter with it's own challenges. I can get sound from the USB soundcard, but I have trouble with startx overwriting my soundcard settings. Perhaps I can use MRL in headless mode to avoid that issue, but I haven't done that yet, since I use the web-browser to download much software for image processing. I have spent many hours building the body for InMoov and I'm almost finished with the body. I received 8 new servos this week for the body, in addition to the 4 that I already have. I hope that I can make more progress during the holidays. If you choose to use the PI, it's a more challenging task than to use a PC. But I don't regret the choise. I have learned many new things and that is the whole point for me. I don't have a clue how I will use the robot when it's finished, but I expect to learn many new things during the journey. And it's also a project where I can use the skills that learned in school, but never used.